How to Break In Your Cowboy Boots - 5 Ways to Get Instant Comfort
Limping in your Luccheses? Annoyed of your overly snug Ariats? Your cowboy boots may be well-made, but that doesn’t guarantee they’ll be well-fitting. Thankfully, there’s a way to avoid the unpleasantness of irritated, blistered hooves. Five ways actually. And we’d like to share them with you so that you can be out there toe-tappin’, horseriding, or just plain ol’ regular walking about your day. Keep reading to find out how to break in your cowboy boots at home.
How are my cowboy boots able to stretch?
Most cowboy boots makers use cowhide leather to craft their western-style boots. There are also more exotic boots that use alligator, snake, or even ostrich skins for this popular boot style. No matter where the leather was derived from, organic materials such as these can all be stretched to a degree, which means you’ll most likely be able to free up some space in whichever boot may be in your closet. We do recommend that you heed the care instructions provided with your boots or by your western gear store.
With all that out of the way, let’s mosey on to it!

Sam Moghadam via unsplash
Method #1: Wear your boots with two pairs of socks
Pros: 100% free (assuming you have socks); not messy
Cons: Can be extremely painful; would require multiple sessions to achieve significant stretch
Wearing your boots with two pairs of socks is great method to utilize if you just need a slight increase in the width and height of your cowboy boots’ toe boxes. You may be able to stretch up to a half size up. As you can guess, the pressure from your double-socked feet applies pressure to the leather material to stretch it and ultimately free up some room for your feet.
This method can be (and most likely will be) painful, which is why we’d suggest only wearing a maximum of two socks per foot. Any more than two socks will cram your toes together and lead to blisters when walking around. We’d recommend trying this method at the latter part of the day when it’s a bit warmer, so that the cowboy boot material is a bit more pliant.

Gaelle Marcel via unsplash
Method #2: Steam the inside of your boots
Pros: Inexpensive; can achieve a close-to-custom fit; not too messy
Cons: Water-saturated leather can possibly fade and/or dry out slightly; can be painful; drying process may take a while
This method is a great inexpensive way to achieve a custom fit without creating too much of a mess. If you ask most people how to break in your cowboy boots, they may say that this method is harmful to the leather, so please do this at your own risk. To perform method #2, follow these instructions:
- Using a garment steamer or a kettle of boiling-hot water, direct the steam to the inside of the boot towards the area you wish to stretch for around 20 seconds.
- Direct the steamer away from you and your boots, and press the affected area with your finger. If it feels firm and structured, steam the area for another 15 seconds.
- Once it is soft, warm, and flexible (but not completely saturated); slip the boots onto your feet and walk around in them.
- Ideally, you’d want to keep them on until they dry to ensure it conforms to every feature of your feet. If that is too uncomfortable, remove the boots once the material has cooled and leave them to dry naturally. Do not use a heat source to speed up the process as this will damage the material.
- Once dry, condition your cowboy boots with a conditioning product (like Leather Honey or mink oil) appropriate for the type of leather of your boots.
You can certainly achieve a custom fit with this method, but you must keep in mind that you may sacrifice the integrity of the leather and the vibrancy of the dye treatment. To what degree depends upon many things including the type of leather, the quality of the leather, the type of dye and treatment, and how saturated the boot gets.

David Becker via unsplash
Method #3: Submerge them in water
Pros: Inexpensive; can achieve a custom fit; tried-and-true method
Cons: Water-saturated leather can possibly fade and/or dry out; very messy; takes a very long time to dry; can be uncomfortable to painful; can be scary to put a brand new pair in water
“Submerge my new Tony Lamas in water? Are you crazy?” Yes, this is definitely a drastic method for freeing up space in your western-style boots, but it’s certainly an effective and popular one as evidenced by boot wearers on the The Chronicle of the Horse and The Horse Forum online forums. This method frees up space in your shoes by the same principle as method #2. Water naturally loosens fibers which gives your cowboy boot material the flexibility to hug every curvature of your feet like a glove. To perform method #3:
- Fill a bathtub or trough with lukewarm water.
- Submerge as much of the cowboy boots in water without having water enter the insides. Use your hands to press down on the insoles to prevent the boots from floating.
- Once you begin to feel the insole get slightly wet, pull the boots out of the water.
- Slip on some socks or breeches and put on your boots. You can also wear a plastic bag over each sock to avoid the uncomfortable feeling of walking in wet boots.
- Wear the soaking wet cowboy boots and walk around until they are completely dry or close to it. It certainly helps to begin this process in the morning and during the warmer seasons.
- Once dry, condition your cowboy boots with a conditioning product appropriate for the type of leather of your boots to prevent cracking.

Method #4: Freeze a bag of water within the boots
Pros: Inexpensive; non-intrusive; passive stretching; stretches in small increments if you’re afraid of ruining your boots
Cons: Requires multiple sessions for substantial stretches (e.g., a half-size stretch); can be time-consuming; boots may not fit in the freezer; only frees up space in the toe box area
When water freezes into ice, it expands. Isn’t science just amazing? All jokes aside, you can utilize this naturally occurring behavior to stretch the toe box area of your cowboy boots. To perform method #3, follow these instructions:
- Fill a gallon-sized, sealable bag with water. ½ to ¾ full is sufficient.
- Seal the bag. Try to seal as little air as possible. You may want to turn it upside down to ensure water will not leak out.
- Insert the water bag into the toe box of your boot and ensure that it is as close to the toe as possible.
- (optional) Stuff some socks or crumpled newspaper behind the water bag to keep the water bag in place.
- Leave in your freezer for at least 8 hours. It will expand in size and stretch your boots.
- Thaw the bag of ice before removing it gently.
This non-intrusive method is great for small stretches and is great for alleviating an annoying corn or callus. It certainly takes quite a while, but is a method more palatable then dunking your new investment in a bathtub of water!

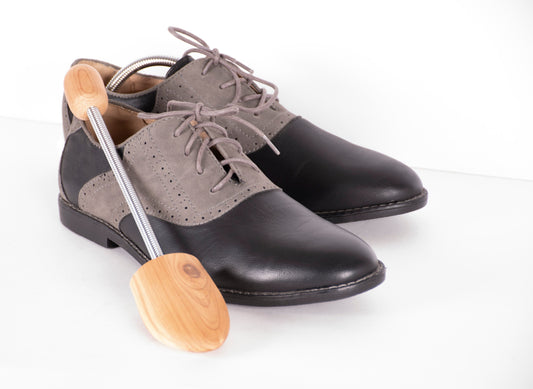
Method #5: Use a western cowboy boot stretcher
Pros: Non-intrusive; fast-acting; passive stretching; greater control; can achieve up to a full boot size up; can use spot stretching plugs to target trouble spots; can start wearing your boots right away
Cons: Upfront cost of stretcher; only stretches the toe box widthwise and at spots where the plugs are inserted (would have to utilize other types of stretchers for the height of toe box)
Using a western cowboy boot stretcher is the most convenient method of this list while still being effective. Unlike methods #2 and #3, the cowboy boot expander allows you to passively stretch your boots; that is, you just set them aside to do their work as opposed to walking around with wet boots for hours. Boot stretchers are also very fast-acting—taking as little as 6 hours for a half-size increase. This is a great time savings as methods #2 and #3 could take days of waiting for your western boots to dry.
The only downside compared to the other methods is that you have to purchase the western boot expander. If you have more than one pair of cowboy boots, the stretcher instead becomes more of an investment. Here is how to use a western cowboy boot stretcher to get a little extra space in your boots’ toe box:
- Apply shoe stretch spray to the inside of your boot to relax the material for stretching. You can also wipe the inside of the boot with a cloth saturated with shoe stretch spray.
- If needed, insert the plugs into the corresponding plug slots on the toe block prior to stretching.
- Insert the toe block into the toe box of your boot. Make sure to wedge it in far enough that the toe block touches the end of the toe box.
- To widen the boot, turn the widening handle clockwise to expand the toe block. Once snug, turn 2 to 3 more times for a proper stretch.
- Once your desired width settings are set, leave the stretcher in your boot for at least 6 to 8 hours.
- To remove the stretcher, turn the widening handle counterclockwise to fully retract the block. Pull out slowly.
Final Thoughts
While there are many methods to get some extra space in your cowboy boots, the ideal scenario is purchasing a pair of well-fitting boots from the get-go. Of course, it’s much more difficult in practice given the uniqueness of each pair of feet and the sizing methods of each cowboy boot brand. Our tips?
– Try on a lot of brands. One brand’s sizing may be more accommodating for your feet.
– Make sure to wear the breeches or socks you plan to wear with your new cowboy boots.
– Schedule your boot shopping for the end of the day when your feet are its largest.
You can’t have a toe-tappin’ good time if your toes are blistered and irritated, so we hope this cowboy boot stretching guide spares you that pain by giving you knowledge on how to break in your cowboy boots!
Main image by Lee Pigott via unsplash